How to Automatically Submit Sitemap to Google Programmatically

Generating a sitemap is only the first half of the SEO hurdle. If you’ve read my previous article on how to create and submit an XML sitemap, you already know how to use the Fast Sitemap Generator to crawl your site and create a clean, search-engine-ready file. However, here is the frustrating reality: even after you’ve uploaded that sitemap to Google Search Console, you might still be waiting days, weeks, or even months for Google to crawl and index those new pages.
If you are running a news website, an e-commerce store with changing inventory, or a platform that publishes time-sensitive content, you don't have time to wait for Google’s "natural selection" process. You need your content indexed now.
In this article, we’ll walk you through how to take control of your indexing by automatically submitting your sitemap URLs to Google programmatically. We will cover the manual way (the "hard" way) using Python and the Google Indexing API, and then we’ll show you the professional way to automate the entire pipeline using the Google Indexer & Instant SEO Submitter Apify Actor.
Why Just Submitting A Sitemap Isn't Enough
When you submit a sitemap in Google Search Console, you are essentially leaving a note on Google’s doorstep saying, "Hey, I have some new stuff in here whenever you're ready." Google will address it when it wants to. For most sites, this is fine. But if you have:
- Frequently updated content: Price changes, stock availability, or breaking news.
- A massive site: Large sites often struggle with "crawl budget." You want to tell Google exactly which pages are the most important at the moment.
- A brand new domain: New sites have zero authority and might sit in the "discovered - currently not indexed" purgatory for a long time.
The Google Indexing API addresses this issue. While originally intended for jobs and live broadcast content, SEO professionals have found it to be incredibly effective for almost any type of content looking for an "instant" crawl nudge.
Part 1: Setting Up The Google Cloud Infrastructure
Before you can write a single line of code or use any automation tools, you need to navigate the Google Cloud Console. This is where most people tend to get stuck, so let's walk through it step by step.
Google Cloud Console
1. Create a Google Cloud Project
Go to the Google Cloud Console. If you don't have a project yet, click on the project dropdown in the top-left corner and select New Project. Give it a descriptive name, such as "SEO Indexing Automator."
2. Enable the Indexing API
Indexing is not enabled by default. You need to tell Google you intend to use it.
- Navigate to APIs & Services > Library.
- Search for "Web Search Indexing API" (sometimes just called "Indexing API").
- Click Enable.
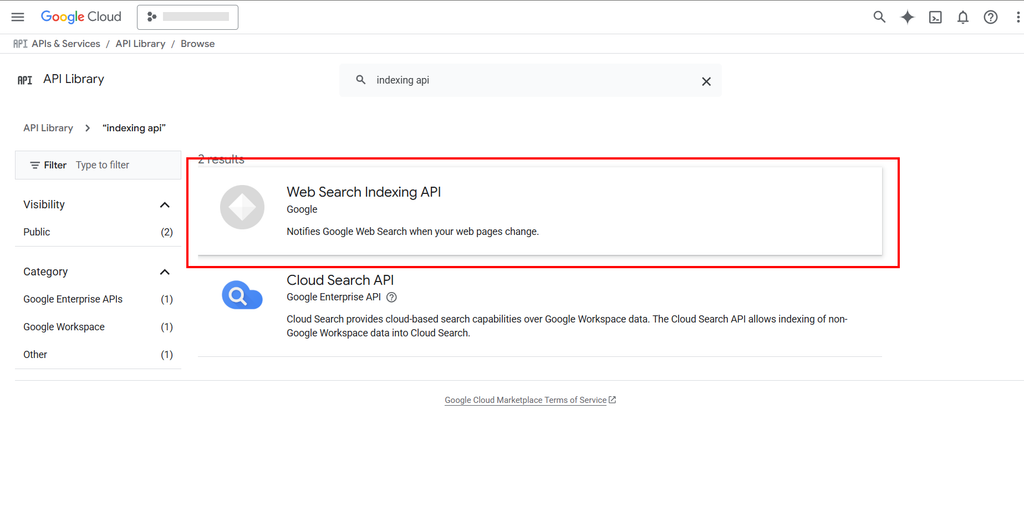
Enable Indexing API
3. Create a Service Account
This is the "person" who will be acting on your behalf.
- Now, go back to IAM & Admin > Service Accounts.
- Click Create Service Account.
- Give it a name like "indexing-bot" and a description.
- For the role, you can choose Owner for simplicity during setup, or Project > Editor for a more restricted approach.
- Once created, click on the email address of the service account. It should look something like
indexing-bot@your-project.iam.gserviceaccount.com. Copy this email; you need it for GSC later.
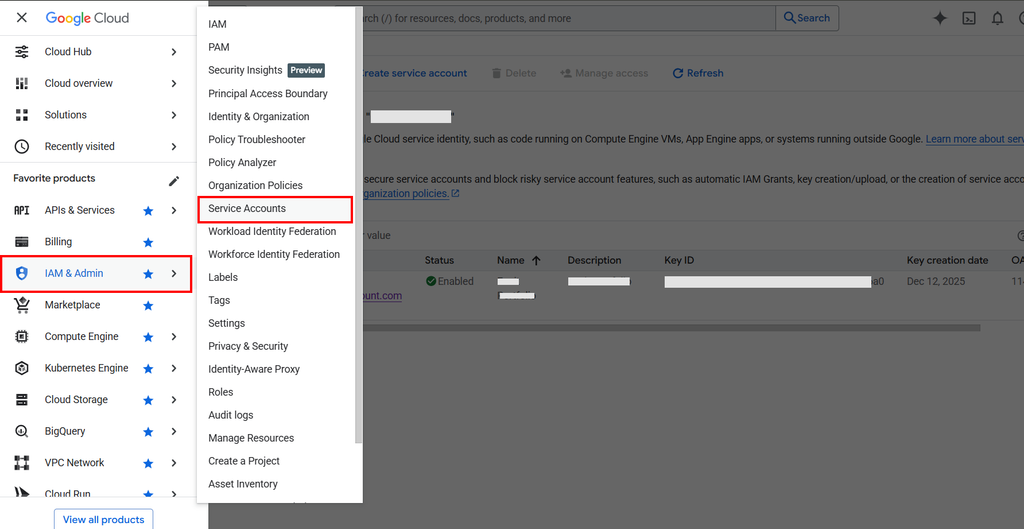
Create Service Account
4. Create and Download the JSON Key File
- Inside your service account details, go to the Keys tab.
- Click Add Key > Create new key.
- Select JSON and click Create. Your browser will download a file. Keep this safe! It contains the "password" to your indexing bot.
Part 2: Connect the bot to Google Search Console
This is the step everyone misses. Even if you have the API enabled, Google won't let your service account submit URLs unless it has verified ownership of the site.
- Open Google Search Console.
- Select the property (website) you want to automate.
- Go to Settings > Users and permissions.
- Click Add user.
- Paste the service account email you copied earlier.
- Set the permission to Owner. (Google requires owner-level permissions to use the Indexing API).
Now the pipes are connected. Let's look at how to push the data.
Part 3: The Developer Way - Programmatically Submitting Urls
If you want to build this yourself, you can write a script that parses your sitemap and sends each URL to the API. Here is a high-level overview of how you'd do it in Python.
The "DIY" Python script
You’ll need a few libraries:
pip install requests google-auth google-auth-httplib2 lxml
The script works by reading your sitemap XML and iterating through the <loc> tags. For each URL, it makes a POST request to Google.
import requests
from google.oauth2 import service_account
from google.auth.transport.requests import AuthorizedSession
from lxml import etree

# Constants
SERVICE_ACCOUNT_FILE = "./your-key.json"
SITEMAP_URL = "https://example.com/sitemap.xml"
API_URL = "https://indexing.googleapis.com/v3/urlNotifications:publish"

def submit_to_google(url, authed_session):
 data = {"url": url, "type": "URL_UPDATED"}
 response = authed_session.post(API_URL, json=data)
    return response.status_code

# 1. Auth
credentials = service_account.Credentials.from_service_account_file(
    SERVICE_ACCOUNT_FILE,
    scopes=["https://www.googleapis.com/auth/indexing"]
)
session = AuthorizedSession(credentials)

# 2. Parse Sitemap
resp = requests.get(SITEMAP_URL)
root = etree.fromstring(resp.content)
urls = [loc.text for loc in root.findall(".//{http://www.sitemaps.org/schemas/sitemap/0.9}loc")]

# 3. Submit
for url in urls:
 status = submit_to_google(url, session)
    print(f"Submitted {url}: {status}")
The Limitations Of DIY Automation
While the script works, it lacks several production features:
- Rate limiting: Google has strict quotas (usually 200 URLs per day). You need to handle 429 errors gracefully.
- Incremental updates: You don't want to submit 10,000 URLs every day if only 5 are new.
- Reporting: You need to know which URLs failed and why.
- Scheduling: You have to host this script somewhere and set up a cron job.
Part 4: The Professional Way - Using The Apify Platform
If you don't want to manage servers, handle complex authentication boilerplate, or write your own rate-limiting logic, you should use the Google Indexer & Instant SEO Submitter on the Apify platform.
This Actor is designed to handle all the heavy lifting for you. It can read your sitemap directly, handle authentication via your JSON key, and even integrate with other Actors to form a complete SEO pipeline.
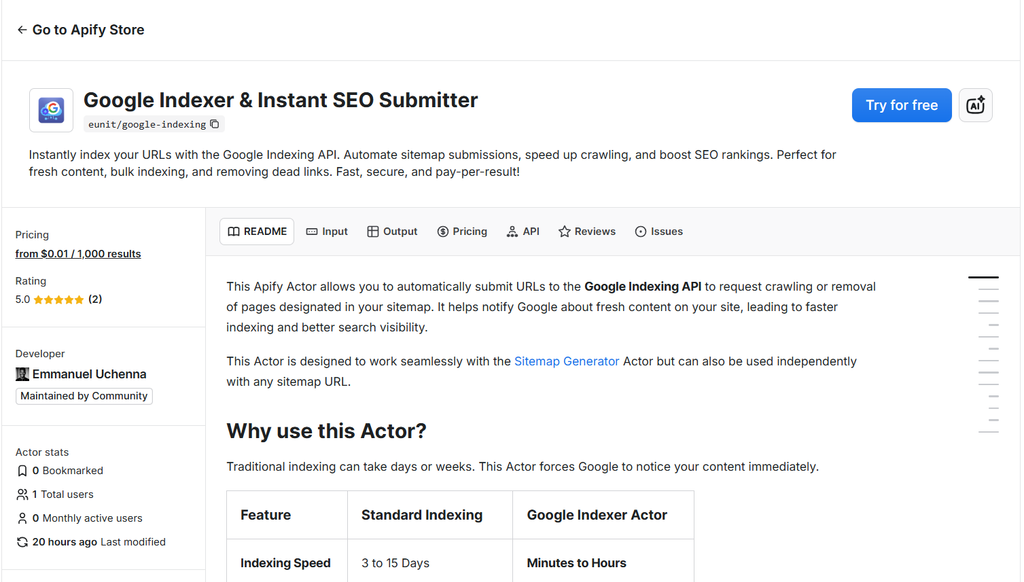
Google Indexer & Instant SEO Submitter
Why Use The Google Indexing Actor?
- No-Code configuration: Paste your JSON key and your sitemap URL.
- Dataset integration: It can take a
dataset_idfrom a previous crawl (like from the Fast Sitemap Generator) and index those results immediately. - Error handling: It automatically detects rate limits and waits or stops as needed to prevent account flag.
- Pay-Per-Event pricing: You only pay for successful submissions. It is incredibly cost-effective, starting at just $0.01 per 1,000 results.
- Test mode: You can run a dry-run to see which URLs would be submitted without actually calling the API or incurring costs.
Part 5: Building a Complete SEO Automation Pipeline
The real power of Apify comes when you connect these tools. Instead of manually generating a sitemap and then submitting it manually, you can automate the entire chain.
The Workflow
- Step 1: Use the Fast Sitemap Generator to crawl your site. This Actor will find all active pages and generate a sitemap. Check out our previous article detailing how to generate your free sitemap using the Fast Sitemap Generator.
- Step 2: The Google Indexer & Instant SEO Submitter takes the output of the first Actor.
- Step 3: It iterates through the discovered URLs and notifies Google.
How to set this up on Apify
- Run the Fast Sitemap Generator with your Start URLs.
- Copy the Dataset ID from the run results.
- Open the Google Indexer & Instant SEO Submitter.
- In the Dataset ID field, paste the ID you just copied.
- Add your Google Service Account JSON.
- Click Start.
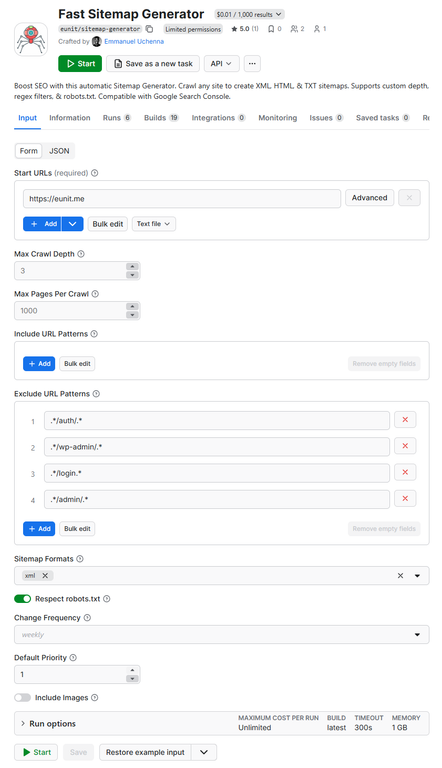
Configuring and running the Fast Sitemap Generator
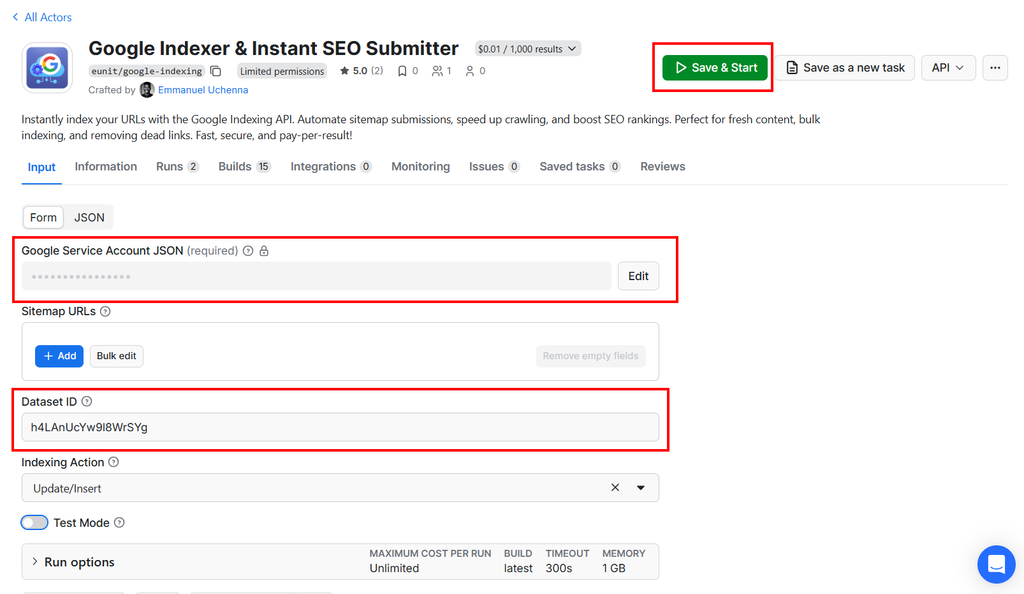
Configuring the Google Indexer & Instant SEO Submitter
The Actor will now intelligently parse the XML generated by the first step and submit every unique URL it finds. Because it tracks sources, it ensures you aren't double-charged or submitting duplicates.
Best Practices For Programmatic Indexing
To get the most out of these tools, keep these tips in mind:
- Don't spam Google: Use
URL_UPDATEDonly for truly new or significantly updated content. If you are testing, use the Test Mode toggle in the Actor settings. - Match your canonicals: Ensure the URLs in your sitemap are the exact canonical versions. If your site uses
https://www., don't submithttps://. - Monitor the quotas: Standard projects get 200 requests per day. If you have a massive site, you can request a quota increase from Google, but the Google Indexing Actor will help you manage this limit automatically by stopping when the limit is reached.
- Check Search Console: After running the automation, keep an eye on the "Indexing" report in GSC. You should see "Crawled - currently not indexed" change to "Indexed" much faster than usual.
Wrapping Up
The days of waiting for Google to notice your hard work are over. By combining the power of the Fast Sitemap Generator and the Google Indexer & Instant SEO Submitter, you can build a professional-grade SEO engine that ensures your content is live in search results within hours, not weeks.

Emmanuel Uchenna
@eunit99Hi, I’m Emmanuel Uchenna — a frontend engineer, technical writer, and digital health advocate passionate about building technology that empowers people. With over five years of experience, I specialize in crafting clean, scalable user interfaces with React, Next.js, and modern web tooling, while also translating complex technical ideas into clear, engaging content through articles, documentation, and whitepapers.